Welcome to this webpage where you will learn everything you wanted to know about bouldering and how to train in order to effectively increase your technique, strength and mental fortitude, so that you can impress everyone in the halls and in the wild!
The content is divided into 3 areas:
- Mental training
- Training technique and skill / tactics
- Physical training
If you’re not sure which one is most important for you, you can take this test and find out which is the area that you struggle with most, so you can directly start improving it.
The majority of the content you will find here, including the test, comes from the book “Training for Climbing: the Definitive Guide to Improving your Performance” by Eric J. Hörst. If you want to dive deeper into any of these topics and learn even more, we definitely recommend you check out this book.
Enjoy!
Mental training
Introduction
The sport of bouldering asks for a lot of physical aptitudes from the climber. When we think of high level bouldering, we think of endurance, power and strength as abilities that a good climber should possess and seek to develop. If we think further, we might consider balance, movement efficiency and technical ability to be other traits that make a good climber. What we think about less however, if what we don’t see, and that is the mental aspect of training and performing at peak levels.
We’ve all encountered that problem where our physical abilities aren’t an issue, but for some reason we feel held back by either fear, anxiety or pain (maybe even all at a time!). Mental training is essential to expand our boundaries, learn from our mistakes and better solve problems, yet how often have you seen someone training their mental fortitude in a gym, pulling on some mental weights? Jokes aside, mental training is about gaining control over your fears and anxieties, increasing awareness through relaxation, training your visualization abilities and increasing your focus. It’s the one skill that you can develop for free, at any time, and that will probably give you the most return on investment in the short term.
Dealing with fear
The way you feel has a direct effect on your mental and physical state. Therefore, experiencing negative emotions such as fear, pain or shame will inevitably influence your abilities and your actions. So how do you get rid of all your negative emotions once and for all you ask? Well not so fast, let’s remind ourselves of the purpose of emotions in the first place. In a nutshell, emotions are above all meant to keep you alive. Your blood sugar is low? You get hungry and cranky, and you want food now. You identify a potential threat? You either make low profile or get pumped up for a fight. You’re on a high boulder in an awkward position? You see all the different ways you could die flash before your eyes and you decide to take a break for a while, here safe on the ground…
Although overall your emotions are trying to make you a service, this does not mean they need to always get the last word. Reasonable fears do keep you alive, but irrational fears can also make your time alive less enjoyable. So then, what do you do? A good starting point would be to think of your emotions as a spouse, hear me out… Like all good spouses, they mean well and care for your wellbeing. They want what’s best for you, but would also be devastated if something were to happen to you, so they sometimes overreact.
The first thing to do when dealing with an overprotective spouse (or emotion), is to take a moment to pause, and listen to what they have to say. They probably have a good reason to be worried… After all, maybe they saw something that you didn’t see, maybe from their experience what you’re about to do usually ends up hurting, or maybe they simply think you’re not well prepared for the challenge you’re about to undertake.
The second step is to soak that information in, evaluate it, then learn from it. What risk did you miss out on, and how come? How come you don’t feel well prepared enough? Is that risk really a rational danger, or is it overblown? You want to show your spouse that you have listened, and that their worries have been taken into consideration.
The third step is, after having evaluated and learned from the observations of your spouse, to devise a plan about what you will do given this new information. Is there a way to mitigate the identified risk? Is there something you can do to reassure your worried spouse? How will you account for the dangers you now see? Maybe it’s by not doing that thing at all, or maybe it’s explaining how that perceived threat is not real, and how you’ll be fine after all. Ideally there’s a negotiation going on, with compromises on both sides, so that both of you go out winning from that exchange.
The fourth and final step is to regain their (and your own) trust. After elaborating your mitigation plan, you implement it and do that thing you wanted to do, and when it ultimately ends up fine in the end, actively reassure your spouse by saying “see, everything is OK, there’s nothing to be worried about”. This way they will eventually learn to trust you, see that you know what you are doing, and be able to cut you some slack.
To make things more concrete let’s illustrate using an example. You’re in UBoulderonia with some friends at “the dome”, and there’s this route that starts with a big overhang, goes up then ends with a top off. The route looks a bit technical but you know you could do it, yet the more you look at it the more your palms start to sweat and you fill with self-doubt. What do you do next?
- First take a moment to pause, take a deep breath, relax. Don’t judge your thoughts or reactions, just focus on what might be at the root of your distress
- Then by closely paying attention to where your emotions come from, you might realize that you feel uncomfortable because:
- There seems to be a heel hook you need to do from an uncomfortable position and the foot placement looks bad so you might fall
- If you fall there’s a big rock that protrudes out of the ground and you’re afraid you might directly fall onto it
- Then if that happens people will laugh at you and you will feel like a loser
- Once you know that, you can set actions in place to deal with what’s at the source of your anxiety, such as:
- Closely inspect that heel hook and try it out from the ground so you get a better feel for it and know exactly how to put it
- Put an extra mat around that rock so you don’t get as worried of hitting it, or ask a friend to spot you closely when you do that move
- Remind yourself that you’re among friends, and if you fall and they laugh you can simply laugh it out with them, they’re not there to make fun of you but rather have fun together with you
- So you climb that route and one of 2 things happen: either you top it which is great, or you fall and nothing happens since you took all the necessary measures. At this point it’s important to remind yourself of how you got things under control this whole time and there was no reason to be worried in the first place, you could have taken the same precautions without the worries
Hopefully the example above now gives some clarity on what you can do to deal with fears and negative emotions. Now that we’ve seen what to do, here below some examples of things you want to absolutely not do:
- Get defensive and push your spouse/emotions away. No one wants to have a neglected spouse, we all know how that ends: both end up drifting apart, while remaining bitter and distrustful of each other
- Give in too quickly and let your spouse always win. If you do that you’ll never get to confront your spouse’s distorted view of reality and you’ll end up creating a self-fulfilling prophecy
Overall remember that you need to engage with and challenge fears, not accept them at face value. It’s the only way to push your boundaries and grow your comfort zone.
Relaxation
According to Hörst, when bouldering or climbing, it’s almost always better to be in a low-energy, positive mindset. This might seem counter-intuitive as bouldering can be associated with powerful moves and firm grips, however this is confirmed when we look at how elite climbers have a tendency of making routes look easy, and always seem like they’re just having fun! Moreover, creative problem solving, fine motor skills and engaged learning all necessitate a low-energy, positive state, thus the importance of relaxation.
Regarding the positive mindset, it’s interesting to note that it’s not the events in our life that cause us stress, but our reaction to them. Recognizing this is a first step towards taking back control over our reactions and regulating the amount of stress we experience. On a route, stress manifests itself as muscular tension, which leads to over gripping holds, nervously muscling through a pass and lacking general movement fluidity. The key is to recognize when this happens and release the tension before it builds up.
Hörst defines two methods to increase relaxation, called progressive and differential. Progressive relaxation consists of purposefully tensing and relaxing different muscle groups one after the other. The goal of this method is to create an increased awareness of your body, by regularly and consciously adjusting your muscle tension. A sequence for a progressive relaxation exercise would be the following:
- While sitting in a comfortable position in a quiet place, take 5 deep breaths (you can also close your eyes)
- Tense the muscles in the lower part of one of your legs for 5 seconds
- While you feel the tension, let go and relax completely. Feel the difference between the tensed and relaxed states
- Repeat the sequence for the upper part of the same body part
- Repeat the process for the other leg, each arm, your torso, and end with the muscles of your face and neck
- Open your eyes and welcome to the matrix
Afterwards, differential relaxation is used in an active situation, like in the middle of climbing when you want to relax your muscles and increase efficiency. The problem with being tense while climbing is that it creates antagonistic muscle contractions, which work against the movements that you actually want to do. This leads to energy waste and premature fatigue. A simple solution is to scan for unnecessary muscular contractions and body tension, and make it go away through breathing and visualization exercises.
Hörst uses a sequence called ANSWER before and during each climb, which works as following:
A – Awareness of rising tension, anxiety, or negative thoughts. Pay attention to your thoughts and sensations, if you notice anything just let it seep through your awareness without judging it
N – Normalize breathing. During a climb, your breathing should be as regular and relaxed as a fast walk, so take a moment to smoothen it out
S – Scan for specific areas of muscular tension. Make a quick body scan and see if you can spot any pockets of tightness (usually in the forearms, shoulders, upper back, chest, abdominals, or calves). If you locate something, consciously contract that muscle for a few seconds, then let go and focus on the feeling of tension leaving your body
W – Wave of relaxation. Take a deep breath and feel a wave of relaxation wash over you
E – Erase thoughts of past events (or the possible future) and focus on the present. Thoughts of the past and future events are the enemies of present excellence. Simply engage with the present moment
R – Reset posture and flash a smile. You can do this, just let go of your expectations, trust your skills and have fun!
So next time you’re out there bouldering remember to let go and relax, before and during climbing, and just have fun!
Visualization
Did it ever happen to you that you gave a route 4 tries and every time you just can’t seem to top it for one reason or another, then you forget about it, try it later in the end of the session and you just flash it? What happened? You didn’t get stronger in the meanwhile, nor did you get a better technique either. What likely happened is that you internalized the moves and sensations of that route such that the next time you climbed it you had a more realistic expectation of how it would be like and what you would do, thus significantly increasing your confidence and movement efficiency.
Now that’s great, but what if I told you there’s a way to get almost the same result while skipping the 4 tries at exhausting yourself on the same boulder problem? Well that way is visualization, and if you’re not used to using it the good news is that it’s a free tool you can use from now on to dramatically improve your game!
Visualization means making a detailed mental movie inside your head of yourself doing the moves of the route you want to do. By doing that, you actually trick your brain into thinking it has already done the moves, hence the route will feel more familiar, you will feel more confident about what to do next and hence waste less energy guessing your way through. You can also think of these mental movies as a sort of blueprint for future action. The more detailed the movie, the less time you have to spend thinking about the route while you climb it, and the more time you can spend relaxing and staying in your flow.
According to Hörst, there are two types of visualization: dissociated and associated.
Disassociated visualization is when you see yourself climbing from an observer’s perspective. This can be used for reviewing a previous climb, and identifying what might have gone wrong. That information can then in turn be used to perform associated visualization.
Associated visualization is seeing yourself on the route from the first person perspective, or what you would see if you were actually doing it right now. The aim is to pre-program the moves for yourself before you actually do them, so that when you do it you feel confident and know what to expect.
So to sum up visualization is an easy way of learning and effectively preparing for a climb without any cost in effort. The more you practice, the more realistic your mental pictures become and the more effective you will be at flashing those routes. Visualization is like the use of climbing shoes and a chalk bag. Don’t leave the ground without doing it!
Training technique and skill / tactics
The basics
Foot placements that carry your weight
An important thing in climbing is that the legs should, in principal, do the most work, because they are much stronger than the arms. In order to get as much weight on the feet as possible, effectively using them is important. This starts with paying a lot of attention to the foothold, and your foot placement on the hold, even though it is more difficult than paying attention to your hands. Therefore, it is important to keep constant focus and practice on placing the feet in order to develop good footwork.
Next to placement of the foot, alignment of your center of mass over a foothold should be practiced. Where the weight should be centered depends on the type of wall. On a slab, the hips are out of the wall and over the feet. On a vertical wall your body should be positioned straight over your feet. On an overhanging wall, it is no longer possible to keep your weight over your feet, so other techniques are required, that are described later.
Gripping handholds lightly and relaxing the arms
It can happen that, due to anxiety, people grab the holds with much more power than necessary. This results in faster fatigue or pumped forearms. Luckily this can be practiced and be avoided. This also starts with consciously gripped each hold, instead of just grabbing the holds. In addition, try to grip each hold with the minimum force required, using the arms mainly for balance, while pushing with the feet (together with a minimum arm pull). Try to relax your arms and straighten them when possible.
So, when grabbing the holds consciously, first think of the best place to grab the hold, as this is not always on top of the hold. Next, decide how much you need to pull down on a given handhold.
Reading routes
Reading a route is an attempt to understand its holds and the movements between them: how you think the route should be climbed. Correctly reading a route before climbing it will save you a lot of time and energy and increase your understanding of movement. That means that you save more of your energy for real attempts, and have a higher chance of finishing your project. When reading a route, inspect all of the holds and pay attention to the following: what are the start and end holds? Which holds are handholds and which are footholds? What place are the holds directed to? Then, start to think of the movements that you need to do in order to climb the boulder: your “Beta”. The sequence of the hand movements, the foot placements, your body position etc.
After thinking of a plan, try to execute it. If your plan worked that is great. If you fall (which is very common and usual) it is time to evaluate. Find a reason for the fall and think re-adjust your plan, then try again!
Climbing efficiently
Improve body position on the wall
When climbing, you usually want your center of mass to be above your feet as much as possible. When the wall is vertical or overhanging and you hang normally with your head facing the wall, your hips will hang out of the wall. The following points are some techniques to get your hips closer to the wall, even in an overhang:
Using opposing forces
In order to have maximum ease of movement and maximum stability, pair a right hand with a left foot, or the other way around. You automatically do this when climbing a ladder, and in easy climbs this principle should be easy to apply. On more difficult climbs, it is harder to make smart use of this. There are a few principles to make use of opposing forces, even on harder routes. There are multiple arm movements like side pull, Gaston and undercling that can be matched with an opposing foot placement.
Flagging
Another way is to use flagging with the foot to enhance stability. When a left-hand right-foot combination is not possible by only using the holds, you can flag a foot on the wall. This improves stability and balance by shifting the center of mass closer to the weight bearing foot. The direction of the flag placement depends on the position that you are in.
Twist lock + backstep / drop knee
When climbing, your weight is ideally placed directly over your feet, so that you have as little weight on your arms as possible. However, on an overhanging wall, it is no longer possible to have all the weight on your feet. The twist lock and backstep are executed by turning the hip of the backward leg into the wall. This technique helps to draw the body more into the wall, thus placing more weight on the feet and less on the arms. Therefore, it requires less strength and it is easier to reach the next hold. When attempting this move for the first time, it will be very hard to hold this position. Eventually the moves will feel easier and help to become a better overhang climber.
Creative / advanced footwork
Heel hooks
Placing a heel hook enables you to pull with your heel, as if it were a third arm. Your body is kept closer to the wall, there is less weight on your arms and your body tension is easier to maintain. The heel hook is ideal when climbing on a roof, topping out a boulder or maintaining a difficult position. When using the heel hook to reach a higher handhold, pull as much as possible with the heel, and push with the other foot. As you get higher, quickly reach to the next handhold and place your feet normally again.
Toe hooks
Toe hooking is a more advanced technique, and is typically used to keep the body tight against the wall while doing a move. A good toe hook also draws weight off your arms, thus increasing efficiency while climbing. A toe hook is when you use the top of your toes as the friction point between the shoe and surface area in order to balance or pull. Try to keep your toe hook leg straight when executing this move, and to pull your toes towards your body.
Knee bars
Putting your toe on a hold and then locking your knee against an opposing hold is a knee lock. In this move you are able to release a hand (or even release both hands!). On an overhanging wall or when encountering a non-existent end-hold, this might be the best option.
Dynamic and static movement
In climbing, there is a distinction between static and dynamic climbing. When static climbing, you move your center of gravity before moving to the next hold. In dynamic climbing you make more use of momentum, meaning you thrust your center of gravity at the same time as moving to the next climbing hold. Both are preferable in different situations.
Static movement
Static climbing is a style that uses mainly slow and controlled movements. In some routes, it is demanded to use static movements: when you don’t know how good the next hold is, when you need to hold the next hold in a precise manner, or on a slab where balance is important. In these situations, you need to move slowly and controlled. An advantage of practicing static climbing is that it improves your strength and strength-endurance. This is because the slow movement requires you to lock off on certain positions, and you are on the wall longer. Also, this style allows you to focus on technique like foot-work and body position. A disadvantage of static climbing is that it demands much strength, and therefore you could end up pumped or run out of energy. In addition, some big moves are often not possible going static. In these cases, a dynamic movement is required.
Dynamic movement: use of momentum
Dynamic climbing is a style that makes use of momentum and includes powerful, explosive moves. Some moves or sequences demand dynamic movements to climb most efficiently. In particular in overhanging routes with big moves, or vertical routes with tiny handholds. Climbing such routes dynamically can save energy, because instead of locking off and slowly moving one hand, you use your whole body to throw yourself. Deadpointing is a dynamic move, where the deadpoint is the moment in which you are neither going up or going down, for a second you are weighless. In deadpointing, you make use of this weighless moment to shift your hand to another handhold, in a controlled manner. This way you can reach holds that you could not statically reach.
Another dynamic move, which is bigger and less controlled, is the dyno. A dyno is used when the next hold is way off reach. You explode with your whole body and release both hands and feet, jumping to the next good hold. Then (if succeeded), you grab the hold and gain control of your body. This move takes practice and confidence.
How to decide which style to choose
This is a recognition skill that takes years to develop. To practice, try routes in both a static and dynamic way to notice the difference and determine what works best.
Different holds and grips
There are different types of holds that you encounter in the gym and outdoor. Some are easier to hold onto, and on others, you can hardly stay on the wall. Every hold is used differently, so this section describes the differences between the holds. One tip is applicable for each type of hold you encounter: focus on the direction you want to pull. Holds are often oriented in a certain direction. To get the strongest and easiest grip, pull perpendicular to the hold and line up your weight with that direction.
Jugs
Jugs are the big and open holds, behind which you can place your whole fingers. These are usually the easier type to hold. You can use these holds to rest and shake out.
Crimps
A crimp is a small edge that only fits the pads of your fingers. Because these are harder to hold, body position is important and if you can get your body weight closer to the wall it will help. There are different ways of holding a crimp:
- Open hand: your fingertips are on the edge and the rest of your hand rests onto the wall. This grip places less strain on the tendons, so try to use this as often as possible.
- Half crimp: create a 90 degree angle with your fingers. This allows to create more pulling power than the open hand.
- Full crimp: the full crimp is when the thumb is placed over the other fingers. This is the grip that can generate the most power. However, this technique puts a very high strain on the tendons and pulleys in the fingers and the palm, because the first pad of the fingers is overextended. Therefore, don’t use this technique as long as you are not very experienced, or it could lead to an injury.
Slopers
Slopers are big surfaces that have no positive angle for your hand to grip. This can make it tricky to hold. When climbing on slopers, there are a few things to pay attention to. First of all, use your whole hand to get as much friction as possible. Feel for features in the area that offer a little extra grip like dimples or small bulges. In addition, pay attention to your body position. Keep your weight directly opposed to the direction of the pull, strive for a low center of gravity and maintain body tension to stay balanced as you make your move. This way, you will get the most grip out of the sloper.
Pinches
A pinch is a hold or piece of rock that you pinch between your thumb and your fingers. If you currently have a weak pinch it is easy to practice. Try to make a habit to add your thumb every time that you can get it on a hold.
Pockets
Pockets are holds with holes in it. They can vary from size, they can fit only one finger or your entire hand. If you can only fit one or two fingers, make sure to use your middle finger, as it is the strongest. Be careful with the pockets, because pulling with all your weight on a few fingers could injure the finger easily. When a finger starts to hurt a little bit, move on to some bigger holds.
Physical training
Basics theory
In order to use a common vocabulary for the sections ahead, let’s define some terms.
A muscle group can play three different roles:
- Agonistic: when a muscle or group of muscles are working together to produce the same action or movement (prime movers)
- Antagonistic: when a muscle or group of muscles provide an opposite action to the primary movement
- Stabilizing: when a muscle or group of muscles interact to stabilize the body in space and produce smooth movement
Furthermore, a muscle can produce three types of contractions:
- Concentric: produces shortening of the muscle
- Eccentric: resistance through lengthening of the muscle
- Isometric: contraction resulting in no shortening nor extension of the muscle (no movement)
Speaking about muscles, there are basically two types of muscle fibers that will have different roles and behaviors: slow twitch and fast twitch. Muscle fibers that work in conditions where they have access to oxygen are called aerobic, whereas anaerobic conditions means the muscle fibers are working in the absence of any oxygen.
Slow twitch muscle fibers (also known as type I), account for approximately 50% of the total muscle mass. They are mainly engaged when producing a low-intensity, aerobic endurance type of effort.
Fast twitch muscle fibers on the other hand are engaged when producing a high-intensity type of effort. We can further distinguish two types of fast twitch muscle fibers:
- Type IIa: these fibers can be engaged through both aerobic and anaerobic processes, which gives them some resistance to fatigue. They come in handy when you want to exert a high-intensity effort for a prolonged period
- Type IIb: these fibers have a fast contraction time but can only be engaged through the anaerobic system, which means they need long recovery periods. They can be used for a short maximum power moves
The graph below from Hörst’s book shows in which order these muscle fibers contract.
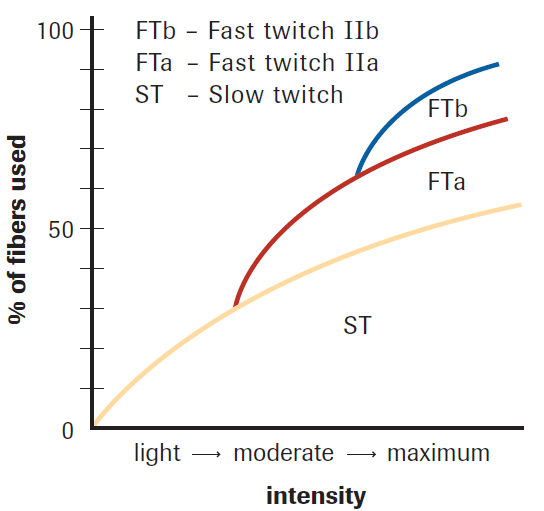
The key takeaway from this graph is that if you want to increase your full strength (thus your type IIb muscle fibers), you need to train at your maximum strength limit. This is why going bouldering regularly will keep you in shape, but that alone will not make you progress further in terms of ability and peak strength.
Muscle function adaptations
When performing strength training, mainly two systems undergo adaptations that allow you to increase your strength: the neural and muscular systems.
Adaptations of the neural system:
- The first adaptation that will give you an increased strength is an improved coordination and movement fluidity. This is called motor learning
- The second adaptation will allow your motor units to contract synchronously, which will increase both strength and power. This is called motor unit synchronization
- The final neural adaptation and probably the most important one, is called disinhibition. Your muscles have a protection mechanism that gets activated during intense efforts. The Golgi tendon organ is sensitive to the tension level in your muscles, and when in high stress sends signals that inhibit the contraction of further muscle groups. This limit in most people is far below the maximum possible force production. Fortunately, we can reduce the sensitivity of the Golgi tendon organ through high intensity training, thus making significant gains in strength without having to build extra muscle mass.
Adaptation of the muscular system:
- In the short term, gains in strength will come from the neural adaptations, however on the long term strength can only further be increased through an increase of muscle fiber size, through a process called hypertrophy
- Large muscles however are not always a good thing for a climber. Certainly if situated in the wrong place (like chest, legs or shoulders), they can also be a liability, providing no extra utility but being an extra weight to carry.
- Moreover, overdeveloped muscles can get in the way of movement and prevent effective lockoffs. The type of training is key here, as most hypertrophy occurs when doing high-load, high-intensity exercises. The goal therefore should be to train with high resistances if you want to trigger this adaptation.
Energy systems
When bouldering, the energy used by your muscles tends to come from two different systems: the ATP-CP system and the lactic acid system.
The ATP-CP system is the first system to provide rapid bursts of energy, but for a short amount of time. This system comes into play when you’re performing intense efforts or maximal load moves. When training, this system is the primary fuel source for intense exercises shorter than 15 seconds (i.e. campus training). During prolonged efforts however, the supply of ATP and CP compounds in muscle cells will rapidly be exhausted, hence the lactic acid system taking over.
The lactic acid system functions in anaerobic conditions and is called into play for medium to high intensity exercises that last anywhere from 10 seconds to 3 minutes. This system is fueled by carbohydrates, and is your primary source of energy for a long boulder problem or climbing route. During a sustained intense physical activity, once your ATP-CP supply is drained, your muscles will work in anaerobic conditions at the expense of the production of lactic acid. The accumulation of lactic acid leads to pain, fatigue and eventually muscle failure (a.k.a getting pumped). For this reason, this type of maximal effort can only be held for about 3 minutes.
On top of this, it can be useful to introduce the notion of lactic acid threshold. The lactic acid threshold is the level of effort at which the production of lactic acid surpasses your body’s ability to evacuate it, hence it builds up in your system and leads to muscle failure. This is represented in the following graph (Hörst):
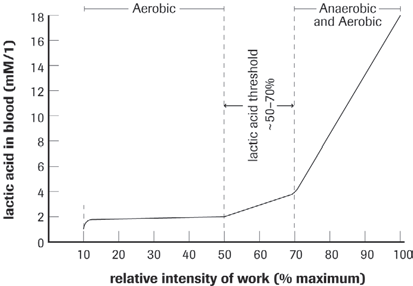
A takeaway from this graph is the importance of using an interval approach when climbing hard boulders or routes. You want to ideally never cross the lactic acid threshold, but if you have to it’s better to push through it as fast as possible until reaching a rest position before you get too pumped. Depending on the concentration of blood lactate in your system, it might take 20 minutes or more to reach a normal baseline after that.
After the 3 minute mark, as ATP-CP levels are depleted and there’s a high blood lactate concentration in the body, muscular contraction can continue only if the intensity is reduced and oxygen is provided (aerobic energy). That reduced intensity is determined by the liver’s ability to filter lactic acid from the blood and convert it back to glucose. This process can go on for several hours as it does not produce lactic acid.
Here below a graph illustrating the different energy systems involved in a sustained effort according to time (Hörst):

Causes of fatigue
From the 3 energy systems mentioned above, it is easy to conclude that a lack of oxygen, depletion of ATP-CP, and a high blood lactate level are all causes of fatigue. They are part of what’s called the cardiovascular/anaerobic model. However, more and more evidence suggests that the limitations imposed by fatigue are much less physical, but rather mental.
The Central Governor Model (CGM) of fatigue describes different elements that come into play that trigger the sensation of fatigue. According to the model, the sensation of fatigue is a message from the unconscious to the conscious mind aimed at preventing the loss of homeostasis (maintaining equilibrium or internal balance of your organism such as a constant temperature). Your brain can thereby send signals of pain, or limit muscular contraction so as to reduce the risk of injury.
We could say that the cardiovascular/anaerobic model and the CGM are the same thing as both lead to muscle fatigue and are triggered by physical signs, however the theory that fatigue is merely a thought and not a hard physical limitation paves the way to some interesting implications. This theory is confirmed when observing how marathon runners can push through their limits and run a last sprint near the finish line if they expect the effort to be of limited duration and the stakes are high. If muscle limitations were solely physical, it would not be possible after such a prolonged effort to still perform such a high intensity task.
This reminds us of the importance of good mental conditioning as a climber. When training, it is important to not only train your muscles, but also your willpower by going those extra reps and sets and not listen to the first signals your brain sends you. Through disciplined effort, high intensity long duration training until high levels of fatigue, you will be able to recalibrate your brain to be less conservative, and be able to perform closer to your body’s absolute limit.
Training principles
Training principles for effective training and exercise programming.
Specificity
This principle states that you should make your training specific to your goals. The more specific a training activity is to a given sport, the more it will contribute to improve at that sport. So, making your training specific to climbing should focus on addressing stress on the muscles in a climbing specific way.
For example, climbing three days in the week, and doing additional weight training that targets important pulling and antagonistic muscles of the back and legs is a good idea. A tip for bringing more climbing-specificity into pull ups (a popular climbing exercise) is to bring variety into them. When climbing, you are always holding yourself at different angles. So when you do pull ups, try to alter in various ways with every set. Change the distance between your hands, have one hand lower than the other, and include lock off motions.
Individualization
This principle highlights that everybody is different, and optimal training looks different for everyone. The best training plan for you focusses on your current condition, your own weaknesses, goals, available time and takes your recovery speed into account. Find out what works best for you and don’t just copy someone else’s training program.
Progressive overload
According to this principle, in order to increase physical capability, you have to expose your body to a level of stress higher than it is accustomed to. This overload can be achieved by increasing the intensity, volume or speed, or decreasing the amount of rest. These can result in more strength, power, endurance or stamina, depending on the type of overload.
For bouldering, focusing on strength of power is preferable. For sport climbing, increasing volume and decreasing rest is suitable.
Variation
This principle states that the body becomes used to training stimuli that are repeatedly applied in the same way. This means that if you follow the same training routine everytime that you go climbing, eventually your strength and climbing gains will plateau. Therefore, try to vary your training, by changing the type of overload, and change the type of climbs and exercises. Another way that you can vary your training is by applying periodization. In periodization, you change the overall workout intensity every few weeks.
Isolation
The principle of isolation requires the targeting of a single muscle group, while activity in nearby muscle groups is minimized. This is hard to achieve, especially when also applying specificity: also being climbing related.
Training isolated muscles is not necessary for beginner climbers, who typically experience steady gains in the first 2-3 years. However, climbers often plateau after these years. To break through this plateau, specific training of your weaknesses is required. Weaknesses are often finger strength, endurance, power in the pulling muscles and core stiffness. Training these can be achieved by combining isolation with specificity: fingerboarding, campus training, system wall isolations and core exercises. These forms of training lead to big improvements.
Optimal sets, reps and rest intervals between sets
The optimal sets, repetition and rest time all depend on the training goal. If you are training for strength and power, high resistance, lower reps and longer rest between sets (around 3 minutes) are advised. If you are training for strength endurance , which is more specific to climbing, a higher volume (more reps and sets) at lower resistance is advised with shorter rest periods. Both forms of training have their own benefits. Where strength training can increase maximum strength, strength endurance training can increase the lactate threshold, meaning that you can train with a higher intensity. In addition, it improves recovery time.
Exercise order
The ideal exercise order is the following.
- Warm up
- Actual climbing
- Targeted supplemental exercises (pull ups, fingerboarding, campusing)
- Stabilizer and core training
- Foam rolling and stretching
Any intense weight training or aerobic exercise is best performed on a rest day from climbing. For climbing, training the antagonist muscles 2 times a week is sufficient.
Rest
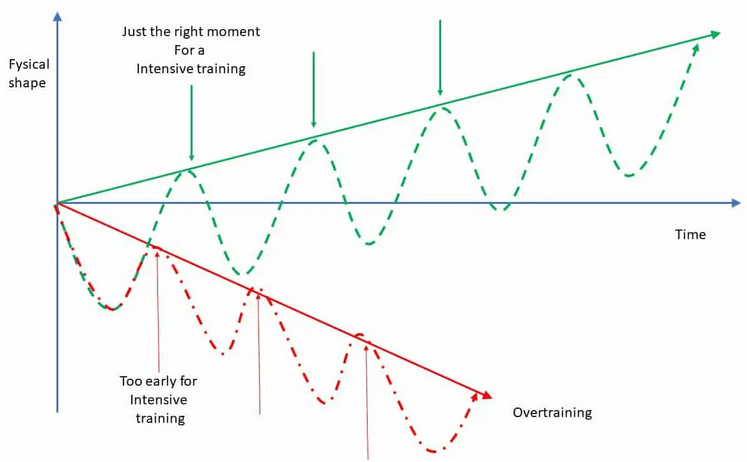
You train with the goal to get better or stronger. Your muscle adaptations indeed occur, not during but after your training. The supercompensation cycle shows that after training, your physical shape first decreases because you are fatigued, then starts to compensate back to the normal fitness level, and then compensates even more, bringing you to a higher physical shape than before.
How long it takes to fully recover varies roughly between 24 and 72 hours. The recovery time can be altered by different factors:
- The intensity of the workout. It takes longer to recover from a power or strength workout or climbing to your max, then a high volume of low intensity.
- Good nutrition, enough sleep and low stress.
The importance of fully recovering before your next workout is visualized in the picture below. When you often train when you are not recovered, instead of getting stronger, you only decrease in performance. This is also when injuries start to occur. Overtraining is very common for climbers.
Also be careful with doing too much high intensity work during one session, since this can cause too much damage, taking much longer to reach supercompensation.
Detraining
This principle simply states that if you stop training, you will make performance losses. Climbing specific: you lose local endurance the fastest, this can happen after more than a week without climbing. Unfortunately, it takes longer to build it back than to lose it, so try to workout steadily throughout the year (RIP Corona). Luckily, strength gains don’t go away as fast.
Training methodology
This chapter will explain 4 different methodologies, how they affect climbing and what exercises you can do to get better at them.
Maximum-strength training
In climbing and especially bouldering, many moves require maximum strength from the forearms, pulling muscles and fingers. For example, locking off one arm to reach the next hold, or pulling hard on one or two arms. Training for better grip and pulling strength is therefore a very important aspect training for climbing.
Exercises for climbing related strength training
Beginners will make enough gains by simply climbing three times in the week, also improving technique. If they want to do additional weight training, they should focus on the large pulling muscles and antagonists. It can be harmful to do specific exercises such as fingerboarding as it can lead to injuries.
For intermediate climbers with a couple years of climbing experience, targeted strength training is a good option to improve. To do this two times a week should be a good start. Strength exercises should be executed by creating a high resistance that produces near-failure in around ten seconds. Examples of exercises are:
- (Weighted) pull ups
- Fingerboard hangs, difficult to hold for 10 seconds (small holds or medium holds with weight added)
- (Assisted) one arm lock offs
- (Assisted) One arm pull ups
Contact strength and power training
Power relates to how fast you can use your strength in a movement, or at what rate a force is applied. Power is therefore closely related to your maximum strength, and also referred to as contact strength. For bouldering, it is ideal to have a high maximum strength, and to also be able to recruit this strength very quickly. Before you focus on power, you should always focus on strength first, because explosive movements strain the muscles and joints a lot.
Exercises:
These exercises are only suited for intermediate and advanced climbers. Begin these with easier progressions with your feet on and progres to the feet off versions. Power / contact strength exercises should always focus on fast engagement of your strength, and on maximal power output for one to ten seconds.
- One arm lunging (feet-on)
- Clap pull ups
- No-feet climbing
- Campus-laddering
- Double dyno’s
Strength-endurance and power-endurance
Both strength and power endurance are part of your anaerobic capacity. Anaerobic exercise is a type of exercise that breaks down glucose in the body without using oxygen. This type is more intense but much shorter (up to two minutes) than aerobic exercise, where more oxygen is required.
In climbing,anaerobic endurance relates to how long the muscles can provide a high power output, that is still sustainable. Strength endurance relates to your forearms strength, where your power endurance is about pulling hard and being able to make dynamic movements. Improving this will result in being able to climb longer pumpy boulders or sport-climbing routes.
Exercises:
Specifically training this type of endurance can lead to improvements in climbing performance, but training till deep and burning pumps too often can lead to a decreased endurance. So also don’t do this too often.
- 20-20 fingerboard repeaters
- Pull up interval
- 1-minute climbing intervals
- Bouldering 4x4s
- Campus board exercises
Climbing specific aerobic training
Training stamina (or aerobic endurance) is very different from training for strength and power. Aerobic training applies to lower intensity, sustained activities where slow twitch muscle fibers dominate. To train stamina, a higher volume is necessary, thus more time climbing combined with shorter rest periods. In these trainings, you won’t be able to climb at your highest grade. Instead, you have to climb a big volume of submaximal effort. You shouldn’t feel too pumped or too out of breath when doing this, although a light pump is desired.
Exercises for stamina are mainly to climb many topped routes, while being sure to never get a more than moderate pump. Therefore go for easier routes. This can also be done traversing boulders, for a long period of time, or climbing outdoors.